

How to remove car window tint? The safest way is to soften the film first, lift one corner carefully, peel it off slowly, then remove the leftover adhesive without scratching the glass or damaging rear defroster lines. Most people do this with heat, steam, or an ammonia-based method, followed by adhesive cleanup and a final glass clean.
Removing tint is often necessary when the film starts bubbling, turning purple, peeling at the edges, or simply no longer suits your needs. Some drivers also remove old film before re-tinting or before switching to a different solution. If you are comparing removal with future film options, you can later explore related topics like car windscreen tint as a separate internal resource.
Why people remove old window tint
Old tint usually comes off for one of five reasons:
- it has bubbled, cracked, or started peeling
- the colour has faded or turned purple
- the adhesive has failed
- the tint no longer matches the look or visibility you want
- the vehicle is being refreshed before new window tint is installed
Protex specifically highlights ageing film, legal compliance, poor installation, aesthetic preference, and vehicle resale as common reasons for removal, while Elite Tint frames removal around bubbling, discoloration, or simply wanting a clearer look again.
Choose the right tint removal method first
Before you touch the glass, decide which method fits the job.
| Method | Best for | Main benefit | Main risk |
| Heat gun / steamer / hairdryer | Most side windows and many standard tint jobs | Softens adhesive and helps peel larger sections | Too much heat or rushed scraping can damage trim or rear defroster areas |
| Ammonia + plastic cover + sunlight | Older or stubborn film, especially when the adhesive is hard and dry | Can break down stubborn glue effectively | Strong fumes, more setup, needs ventilation and care |
| Adhesive remover + gentle scraping | Residue cleanup after film removal | Good for leftover glue | Easy to over-scrape if you get impatient |
Tools and materials you may need
Gather everything before you start:
- heat gun, steamer, or hairdryer
- spray bottle
- dish soap and water
- microfibre cloths
- plastic scraper
- adhesive remover, rubbing alcohol, or an ammonia-based cleaner if needed
- gloves
- face mask if using strong chemicals
- garbage bag or plastic sheet for the ammonia method
Protex lists tools like a heat gun or steamer, razor or scraper blade, spray bottle, microfibre cloths, gloves, and garbage bags for the ammonia route. Elite Tint also includes a steamer or hairdryer, scraper, ammonia-based cleaner or isopropyl alcohol, spray bottle, cloths, gloves, and face mask.
Before you start: three safety rules that matter
Work in a ventilated space
If you are using ammonia or a strong adhesive remover, airflow matters. Open the doors, work outdoors when possible, and avoid closed garages without ventilation.
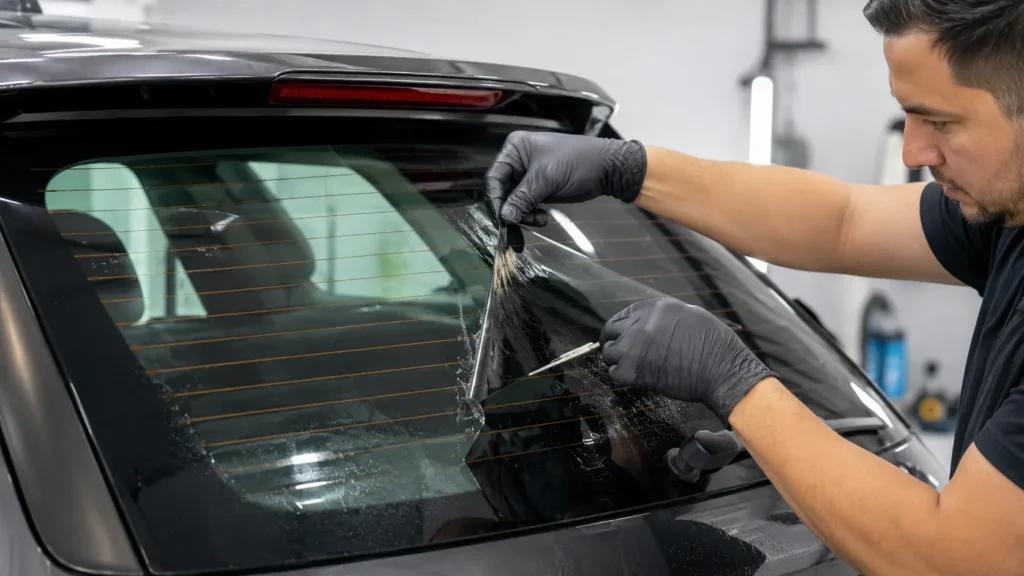
Be extra careful on the rear window
Rear glass often has defroster lines. These can be damaged by blades, rough scraping, or uneven heat.
Do not rush the peel
Fast peeling causes tearing, leaves more glue behind, and often turns a simple removal into a long cleanup job.
Step-by-step: how to remove car window tint safely
Step 1: Clean the surface first
Wipe the window so dirt and grit do not get dragged across the glass while you work. This also helps you see where the tint edges and bubbles are.
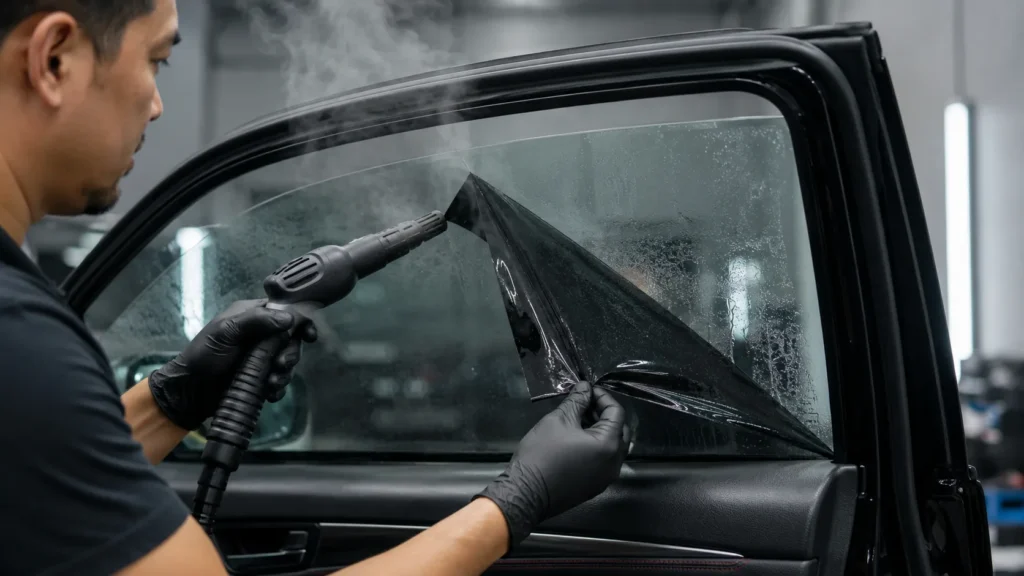
Step 2: Warm the film
Use a heat gun, steamer, or hairdryer to warm the tint gradually. Focus on one section at a time rather than blasting the whole window.
The aim is to soften the adhesive, not to overheat the glass. Protex describes warming the tint from a corner and maintaining a safe distance, while Master Appliance recommends moving the heat across the outside of the window until it feels warm and the tint begins to loosen. Elite Tint also advises focusing on the edges until the film starts curling.
Step 3: Lift one corner gently
Use a fingernail or a plastic scraper if possible. If you must use a blade, do it carefully and avoid rear defroster areas entirely.
Step 4: Peel slowly and evenly
Once you have an edge, pull the film back slowly. Do not yank. If the film tears, stop, reheat the section, and continue again. Elite Tint is particularly clear on this point: pull slowly and evenly, and if it tears, reheat and restart from another edge.
Step 5: Remove the adhesive residue
After the film is off, leftover glue usually remains. Spray the glass with soapy water, rubbing alcohol, adhesive remover, or an ammonia-based cleaner depending on what you are using. Let it dwell briefly, then wipe or scrape gently.
Step 6: Finish with a full glass clean
Once the glue is gone, clean the window thoroughly and inspect it from different angles for haze, streaks, or missed adhesive.
Elite Tint ends with this exact practical idea: final glass cleaning and checking from different angles so the window is fully clear and glue-free.
The ammonia and sunlight method
This method is worth using when the old tint is brittle or the adhesive is especially stubborn.
Basic process
- Park the vehicle in sunlight.
- Protect nearby trim and interior surfaces.
- Spray the tint with ammonia or your chosen solution.
- Cover it with plastic to keep the surface wet.
- Let it sit.
- Peel the film and remove residue.
Protex explains this method clearly, including spraying the tint, covering it with plastic, letting it sit in sunlight, then peeling it off and cleaning the remaining adhesive.
When to use it
Use this when:
- the tint has turned purple and brittle
- the film is breaking into small pieces
- ordinary heat is not softening the glue enough
Main caution
Because ammonia fumes are strong, ventilation and protective gear matter more here than with the heat-only approach.
Side windows vs rear window: why the process is not the same
Many articles do not separate these clearly enough, but you should.
Side windows
These are usually the easiest to remove because:
- there are no defroster lines
- access is simpler
- peeling angle is easier to control
Rear window
This is the highest-risk panel because:
- defroster lines can be damaged
- the glass curve makes film harder to peel cleanly
- glue tends to linger longer
- scraping mistakes are more visible and more costly
Protex devotes a separate section to rear-window considerations, telling readers to avoid sharp tools on defroster lines, use heat carefully, and peel gently. Master Appliance also specifically warns readers to be careful on the back window or any glass with defroster lines or antenna wires.
What to do when the tint tears into layers
Old tint often separates into:
- the top film layer
- a glue-heavy lower layer
- scattered adhesive patches
When that happens:
- stop pulling harder
- reheat the remaining layer
- work in smaller sections
- switch from film removal to glue removal when needed
This is where patience matters. A slow layered removal is usually safer than trying to force the whole window clean in one pass.
Common mistakes that make tint removal worse
Using too much blade pressure
The film is disposable. The glass and defroster lines are not.
Overheating one spot
Heat should be even and controlled, not concentrated in one place for too long.
Pulling too fast
Fast peeling causes more tearing and more residue.
Ignoring ventilation
If you are using ammonia or strong solvent cleaners, poor airflow turns a manageable project into an unpleasant one quickly.
Treating all windows the same
Rear windows need a different level of caution.
DIY vs professional tint removal
| Option | Best for | Advantage | Drawback |
| DIY removal | Side windows, manageable film, patient vehicle owners | Lower cost and flexible timing | More risk of residue, tearing, or rear-window damage |
| Professional removal | Rear glass, very old film, defroster risk, heavy adhesive | Faster, cleaner result with less damage risk | Higher upfront cost |
Protex makes a strong case that professional removal can be worthwhile when glue is stubborn, defroster lines are delicate, or the job becomes more time-consuming than expected.
Read the related guide about how much does it cost to tint car window.
What to do after tint removal
Once the glass is clean:
- inspect for scratches, haze, or missed glue
- clean the interior trim around the window
- wait until the glass is fully clean and dry before re-tinting
- decide whether you want fresh car window tinting right away or prefer to drive untinted for a while
If you are planning a replacement film later, this is also a natural place to internally link to related service content such as car windscreen tint.
Canadian considerations
For a Canadian audience, tint removal has a few practical complications:
Cold weather slows the job
Adhesive gets stiffer in cold conditions. Warm indoor spaces usually make the process easier and more predictable.
Winter grime can hide edges
Salt, dirt, and residue around seals can make it harder to see where the tint ends and where the adhesive remains.
Seasonal timing matters
If you plan to remove and replace tint, warmer months are usually easier for both removal and fresh installation.

Pros and cons of removing tint yourself
Pros
- cheaper than professional removal
- convenient for simple side-window jobs
- useful if you only need to remove one damaged panel
Cons
- slower than expected
- messy if the film tears
- higher risk around rear defroster lines
- adhesive cleanup often takes longer than the peel itself
- frustrating when old tint has degraded badly
Common misconceptions
“You can just peel the tint off like a sticker.”
Not usually. Old tint often comes off in layers and leaves glue behind.
“A blade is always the fastest option.”
Not on the rear glass. It can damage defroster lines.
“If the tint peels off cleanly, the job is done.”
Not necessarily. Residue often remains and must be cleaned separately.
“Heat solves everything.”
Heat helps, but stubborn adhesive often still needs chemical cleanup.
Read the related guide on how remove adhesive from tinted window.
Practical examples
Example 1: Side window with bubbling tint
A heat-and-peel method is usually the best starting point. If the film lifts cleanly, residue cleanup may be minimal.
Example 2: Rear window with old purple tint
This is often a harder removal. Work slowly, avoid blades near the defroster, and consider pro help if the film shreds or glue becomes excessive.
Example 3: Vehicle being prepared for new tint
Do not stop at “mostly clean.” Any leftover glue can interfere with the next install.
Final takeaway
If you want to learn how to remove car window tint, the best approach is simple: soften first, peel slowly, clean the adhesive properly, and treat rear glass with extra caution. Done properly, the job leaves the glass clean, clear, and ready for whatever comes next—whether that is bare glass or a fresh new tint installation.
FAQ: how to remove car window tint
What is the easiest way to remove old tint from car windows?
For many people, the easiest method is controlled heat from a steamer, hairdryer, or heat gun, followed by slow peeling and separate adhesive cleanup.
Can I remove window tint without damaging the glass?
Yes, if you work slowly, soften the adhesive first, avoid aggressive scraping, and treat rear windows with extra care.
Is ammonia the best tint removal method?
It can work well on stubborn or ageing tint, especially with sunlight and plastic covering, but it requires ventilation and careful handling.
Can I use a razor blade on the rear window?
That is risky. Rear defroster lines can be damaged, so this area needs extra caution and gentler methods.
What removes window tint glue best?
Common options include soapy water, rubbing alcohol, adhesive remover, or ammonia-based cleaner depending on the situation and how stubborn the residue is.
Should I remove the tint myself or hire a professional?
DIY is reasonable for straightforward side windows, but older film, stubborn glue, and rear windows with defroster lines are where professional removal often makes more sense.
Can I re-tint the windows right after removal?
Yes, but only after the glass is completely free of glue, haze, and residue.